Get a Cue – Three Freestyle Elements You Can’t Swim (Well) Without
Whether you are new to swimming or have been competing for years, you must master three key technique elements if you want to swim freestyle fast. And, while each element may seem simple, you may need a reminder and a swim cue to stay on track.
Freestyle is the most popular competitive stroke but it is far from simple to swim well. In fact, it is impossible to swim your fastest unless you first master each of the following technique elements. And, while it is certainly possible to learn them in any order, it will be most productive to master each technique element in the order presented. (If you’re not sure what you do currently, ask a fellow swimmer to watch or video you swim a lap or two. You want to know:
- Where you are looking on each stroke? (Are you looking down toward the bottom of the pool, straight ahead, or somewhere in between? Is your head completely underwater, partially underwater, or above the surface?)
- How do you position your legs during each kick? (Are your heels breaking the surface on each kick? Are your legs parallel to the water or angled downward? How much are you bending your knees?)
- At what point do you finish each stroke? (Where is your hand just before you exit your arm from the water? Is it close to your body or out to the side? Is your hand under your shoulder, hip or thigh as you finish each stroke? )
Once you have a clear idea of what you are doing, you’re ready to assess and improve your technique using swim cues.
So what do we mean by a cue?
Cues are a type of performance prompt commonly used in a number of sport-related sciences, especially biomechanics. Cues are used extensively to guide movement in skill sports. A cue specifies the position or motion of a body part. Cues may be visual (something you can see), kinesthetic (something you can feel), or auditory (something you can hear).
When there is the option of using visual or kinesthetic information, athletes typically will control motion better with visual information. However, about three-fourths of the stroke cycle is out of the swimmer’s range of vision. Consequently, swimmers must generally rely on kinesthetic feedback – i.e. what they feel at a certain point in the stroke.
The three priority technique elements for effective freestyle relate to head position, leg position, and hand position at the end of each stroke. We’ll take a look at each in the rest of this article.
Priority 1: Maintain a stable head position.
Well, not just any stable head position! Instead, you will need to keep your head motionless during non-breathing strokes. (And during streamline! Tucking your chin to your chest is not helpful to a streamlined body position as it increases resistance.) Use these cues to monitor your head position when not breathing:
SwimCue 1: Feel the water at your hairline.
Your head should be held as motionless as possible (no vertical or side-to-side movement) with the water level at your hairline. If you hold your head too low, as when your head is below the waterline, you make breathing more difficult. The result: you will swim more slowly and tire more quickly.
This can take some practice, especially if you have been dropping your head below the water at some point in each stroke. Maintaining that motionless positon is important for two reasons. First, it positions your head for breathing with minimal motion. (Think about it: if your head is dropped below the surface of the water you’ll need to either lift your head or rotate it very far to breathe. That takes time and energy and you need both for better things!) And second, a motionless head position makes it easier to visually evaluate the beginning of the arm cycle.
SwimCue 2: See ahead at a 45o angle.
Is your vision directed down and toward the bottom of the pool? Both the wall at the end of the pool and the bottom of the pool should be within your view without raising your head. This simple cue helps you orient your head with respect to the water. If you can see your toes – or for that matter any body part – your chin is tucked and the water is level with the top of your head. (If you are swimming in open water, you should still direct your eyes at a 45o angle whenever you are not sighting for markers or breathing.)
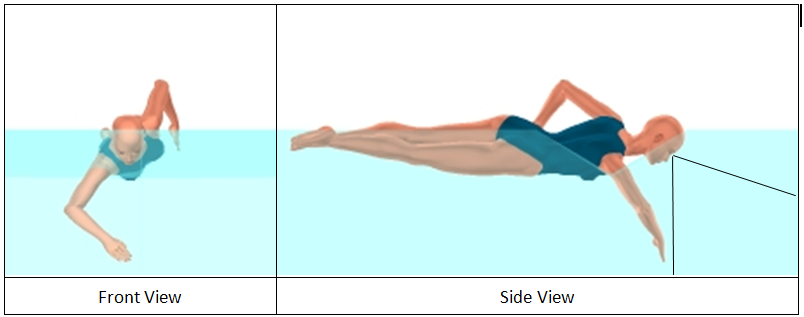
Figure 1. The non-breathing head position with lines showing the boundaries of an optimal field of view (side view).
If the water level is at your hairline, your vision will probably be looking at a 45o angle, and vice versa. (Nice how these two cues work together!)
There are a few other things to consider as you apply these two cues.
First, the head position remains fixed throughout the non-breathing stroke cycle and there is no vertical, lateral, or rotational movement.
Second, the exact position of the water level on the forehead primarily depends on two factors: body composition and swimming speed. Very slight adjustments may be necessary to find the position that works best for you.
- Swimmers with a lower proportion of body fat or a lower swimming speed may need to lower the head slightly (by flexing at the neck) so that the water level is slightly above the hairline.
- Swimmers with a higher proportion of body fat or a faster swimming speed may find they can breathe more easily by raising the head slightly (by extending at the neck) so that the water level is just below the hairline.
Priority 2: Keep your legs parallel to the water surface with your legs almost straight and your toes pointed.
One of the many misconceptions about swimming technique is that the head must be submerged for the legs to stay behind the shoulders. Although lowering the head may help to raise the legs, breathing then requires excessive head motion that distorts the body position and increases the body cross-section (generating more resistance). Since the spine is closer than the head to the legs, arching the back is a much more effective way to control the leg position.
While this may seem self-evident, there are swimmers in every pool with their legs angled downward or with a significant knee bend so that the legs are well below the surface on every kick. Either position creates additional resistance and requires greater effort. (There’s a lot of research that compares a swimmer’s body to the shape of a hull and uses mathematical formulas to explain drag and resistance. It might be easier to understand by remembering riding in a car while holding your arm and hand out the window. If you pointed your fingertips forward and held your arm straight and parallel to the car there was less resistance against your hand than if you angled it either up or down. The impact is, of course, greater in water but the idea is the same!)
Once the head is in an optimal position, it is much easier to orient the rest of the body. Arching the lower back lifts the legs to bring the heels to the surface. If the legs stay behind the torso (as in the front view of Figure 2), resistance is minimal. The smaller the swimmer maintains the area of the body perpendicular to the direction of motion (the body cross-section), the lower the resistance.
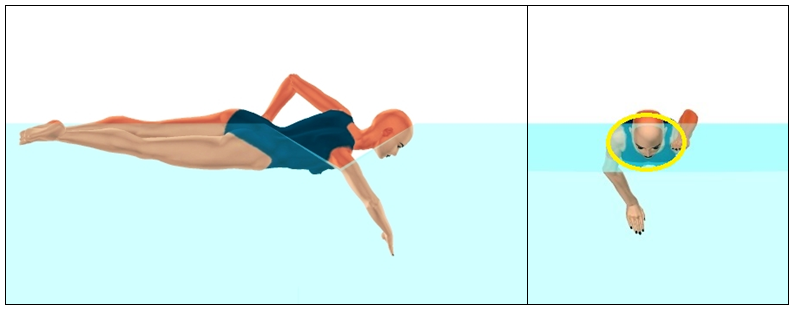
Figure 2. Side view (left) and front view (right) for a swimmer with the legs behind the shoulders. Note that the torso and legs are within the yellow oval drawn around the shoulders to minimize resistance.
SwimCue 3: Feel your heels break the surface on each kick.
There are two phases to the kick: a downbeat and an upbeat.
The downbeat is initiated with downward motion of the upper leg, followed by the lower leg and foot, as shown in Figure 3. (While this order of limb motion is identical to a land-based kicking motion, the range of motion at each joint is drastically less – i.e. there is much less change in the angles at both the hip and knee.)
At the completion of the downbeat, the leg is straight. The straight leg moves upward during the upbeat to return to the position to begin another downbeat.
On the kick upbeat, your feet should be submerged so only the heels break the surface. Most of each foot needs to remain underwater with your legs parallel to the surface. Forget about splash! Don’t bend your knees more to kick harder or faster. The motion should come more from a relatively straight leg and shallow kick. Remember to keep your legs level by arching your back, NOT submerging your head.
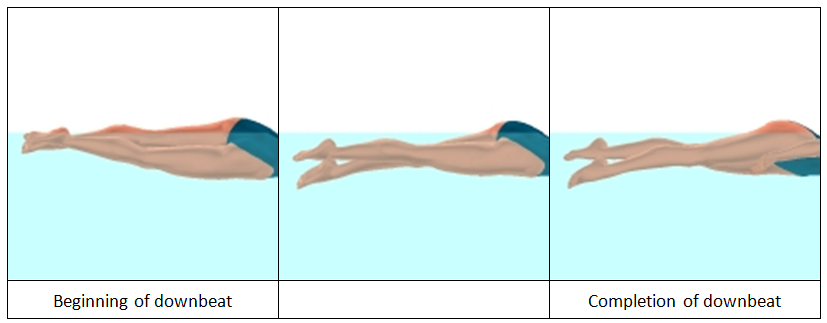
Figure 3. Right leg downbeat
Maintaining this position of your legs (parallel to the surface of the water) is vital. Your legs help to keep your body level and streamlined in the water. If your legs drop and angle downward, you increase drag. (You got it: remember how your hand movement created addition resistance when you held it out the car window? Dropping your legs even a little creates that additional drag.)
As you practice your kick, think of the leg position as being very close to how you hold your legs in the streamline.
Priority 3: Finish the push phase of every stroke.
First a little background. (Skip if this is old news to you!)
Each stroke cycle is divided into phases. Understanding the phases makes it easier to progress through the critical skills. There are four phases of the freestyle arm movement:
Exit Phase – The exit phase begins as the hand changes horizontal direction (from backward to forward) at the end of the push, continues as the arm surfaces, and ends when the arm reaches the vertical plane of the shoulders. (See Figure 4 below.)
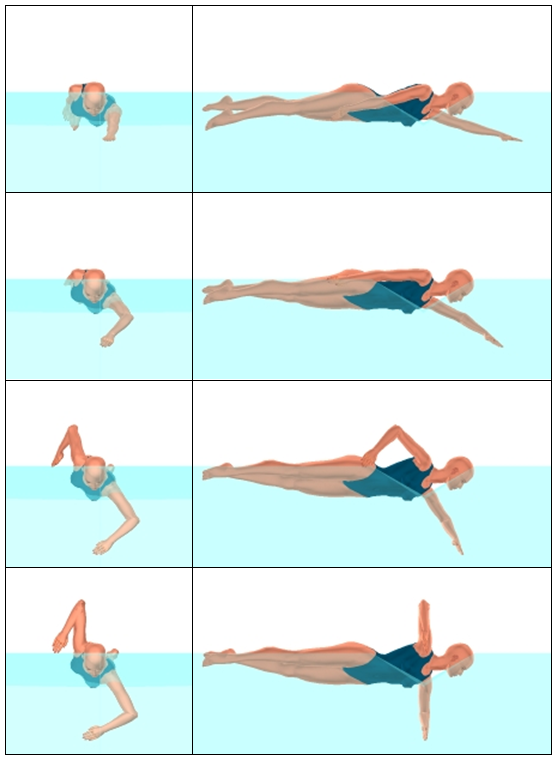
Figure 4. The exit phase for the right arm.
Entry Phase – The entry phase begins above the surface as the arm moves forward from the vertical plane of the shoulders, continues as the arm submerges, and ends when the hand is no longer moving forward. (See Figure 5 below.)
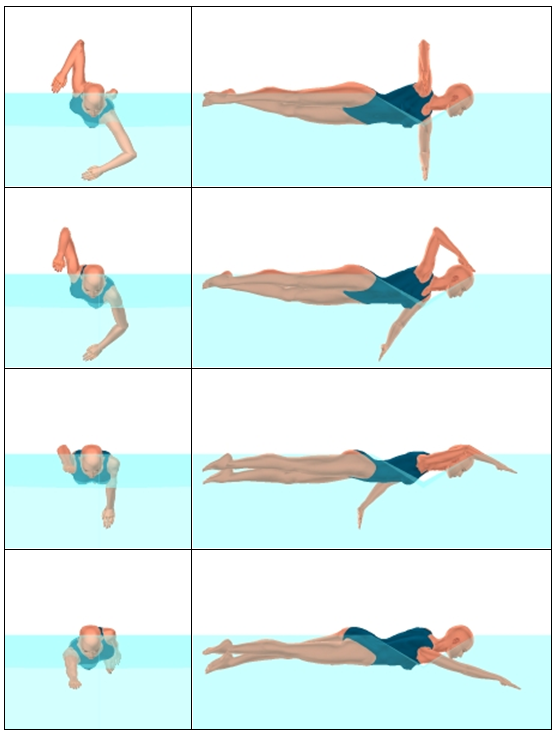
Figure 5. The entry phase of the right arm.
Pull Phase – The pull phase begins as the hand begins to move backward and ends when the hand reaches the vertical plane of the shoulders.
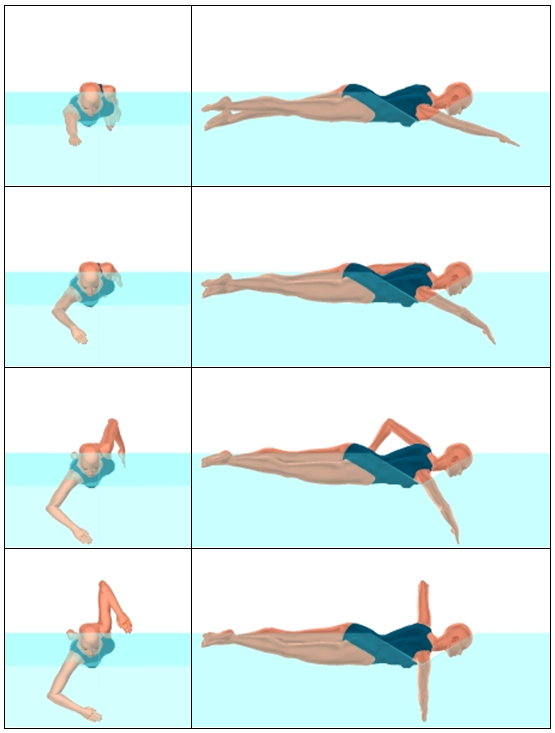
Figure 6. The pull phase of the right arm.
Push Phase – The push phase begins as the hand moves backward from the vertical plane of the shoulders and ends when the hand is no longer moving backward.

Figure 7. The push phase of the right arm.
The final swim cue deals with the push phase and is arguably the most important thing you can do to improve your technique.
SwimCue 4: Feel your thumb touch the front of your thigh at the end of each stroke.
As the torso rotates at the end of the push phase, keep the hand on a backward track to finish the push below the thigh. Avoid the natural tendency to let the hand move upward with the torso as it begins to rotate.
At the completion of the push phase, your thumb should touch the front of the thigh. (See Figure 8 below.) When you push back until you touch your thigh (as opposed to letting the elbow take the arm to the surface), the elbow will remain submerged throughout the push phase.
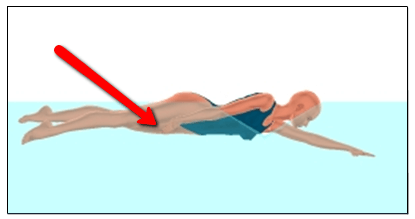
Figure 8.The thumb touches the thigh at the completion of the push phase.
During the push, many swimmers have excess upward motion of the elbow. Consequently, at the completion of the push, the elbow is above the surface. When the elbow moves upward with the upward rotation of the torso, the hand moves upward more than backward. The result is a very sudden loss of hand force (i.e. propulsion.)
So now what?
You already knew that swimming is a skill sport. It requires an individual to master very specific movements (technique) to swim effectively. This piece covered three priority technique elements which are the foundation of an effective freestyle. They are:
- Maintain a stable head position.
- Keep your legs parallel to the water surface.
- Finish the push phase of every stroke.
Each was selected for this article because the cues provided for each priority make it easy for even a novice swimmer to improve their swimming technique. If you’ve ever tried to change a habit, however, you know it always looks easiest on paper. Mastering these three technique elements certainly falls into this same category. It isn’t easy! But, once you can consistently use each of the swim cues above, you will be swimming faster, enjoying swims more, and will be ready for the next set of cues!
Some final, cue-less suggestions for implementing what you’ve just learned.
- Memorize the cues by focusing on only one cue at a time. When you are confident that you can do this technique element, move on to another cue.
- While you are mastering each new cue, swim at slower-than-training speed. (Begin with a 60% effort level.)
- While one important benefit of using cues is to be able to monitor your technique by yourself, asking a friend, parent, or coach for a visual check can be useful in making needed adjustments.
- Don’t be discouraged if you feel – or actually are! – slower or less comfortable while you are working on your technique. Your “old” technique probably feels much more natural and automatic. Remember, the old technique is holding you back and could be contributing to wasted energy, loss of force, and injury.
- For those of you interested in the science behind the ideas, please check out our research on the STR website. https://swimmingtechnology.com/hand-force-and-swimming-velocity/ You’ll also find numerous links to additional resources and reference material. Here’s to faster swimming!
DOWNLOAD A PDF OF THIS POST HERE
(Please add your name to our mailing list if you like what you’ve read!)
About Swimming Technology Research (STR)
Swimming Technology Research was founded by Dr. Rod Havriluk and incorporated in Tallahassee, Florida in 1987. At STR, the science behind an idea is the foundation of every article, blog, camp, clinic, lesson or consult. While not every swimmer shares that fascination with the underlying biomechanical, physiological, and anatomical foundations, any swimmer who wants to be competitive will gain a tremendous advantage by applying proven scientific principles in swims.


