Of course swimmers need to breathe while swimming! But breathing correctly can be a challenge for an inexperienced swimmer. On top of that, a bad breathing habit can take real effort to change.
My granddaughter, Bailey, who is swimming with NOVA in Richmond, has been working to exhale during her stroke cycle and it hasn’t been easy for her. (Full disclosure: Bailey is also a gymnast, soccer and tennis player, and a budding equestrian – which means swimming is on her schedule but might not end up as her first choice for a sport.)
Watching her struggle to master this important swimming skill, I was reminded that knowing the cues for breathing can make a real difference in perfecting breathing. Let’s start with the basics.
How are breathing and non-breathing strokes different?
A breathing stroke cycle in freestyle is identical to a non-breathing cycle – with one exception. A breathing cycle includes enough head rotation to position the mouth just above the surface to allow breathing. Unfortunately, it is very tempting for a new or inexperienced swimmer to lift the head (by extending the neck) instead of turning (rotating) it. Many adults who are new to competitive swimming will do this naturally.
But lifting the head impacts the stroke in a number of unhelpful ways. It interferes with your stroke by increasing drag (the resistance of the water), changes your body position (when you lift your head your torso and legs drop), and requires additional time to drop your head to a more streamlined position and begin the next stroke.
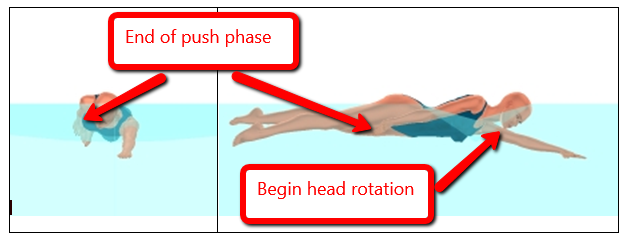
FFigure 1
As the arm on the breathing side begins to exit the water, you inhale. Breathing is completed by the time the arm passes the shoulders (at the end of the exit phase). (See Figure 2 below.)
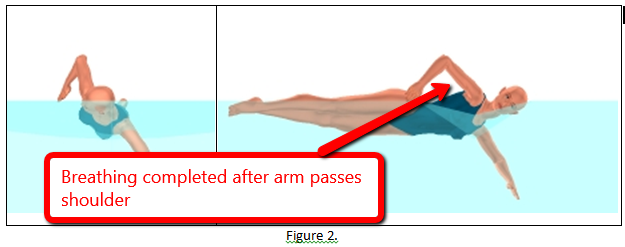
As the arm moves past the shoulders (and begins the entry phase), the head rotates back to the non-breathing position. (See Figure 3 below.)

Figure 3
Some swimmers (like Bailey) will hold their breath and when they rotate their head they will both exhale and inhale. This creates a timing problem because the swimmer can’t exhale and inhale before the head rotates back to the nonbreathing position. It only takes inhaling a big mouthful of water once to make exaggerating the head rotation or lifting the head a regular part of your breathing technique.
Instead, you can exhale the entire time the head is in the non-breathing position. If you exhale completely when your head is in the non-breathing position, you will be able to inhale more quickly and efficiently. (See Figure 4 below.)
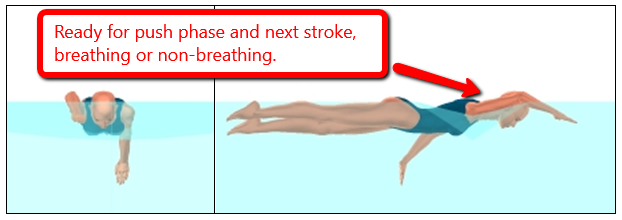
Figure 4
So, how far do you rotate your head to breathe?
Many (actually, most) swimmers rotate their heads too far! A few Swim Cues will help you figure out exactly what you are doing, or need to do next.
As you rotate your head to the side to breathe, look for the surface of the water to come into view. As soon as you can see the surface, stop rotating your head and check if the lower corner of your mouth is touching the surface. If so, you should be able to breathe without inhaling any water. If not, you need to rotate your head slightly more, while staying visually focused on the surface.
SwimCue 1: See the surface of the water.
SwimCue 2: Feel the water at the corner of your mouth.
As you are looking underwater through both goggles in the non-breathing head position, rotate your head to breathe. Check that you are looking underwater through one goggle and above the surface through the other goggle.
It is important to only rotate the head to breathe. Many swimmers will drop their head, and some will slightly lift their head.
- If a swimmer only rotates the head, he/she will be looking to the side at a point directly opposite the position of the head.
- If the head is raised (neck extended) during rotation, the swimmer will see a point slightly in front of the head.
- If the head is dropped (neck flexed) during rotation, the swimmer will see a point slightly behind the head.
What to do? Practice your breathing on every swim.
When you are taking a breath, the hand on the side opposite the breathing side often moves laterally (away from the body) to stabilize the body. While this motion is natural, it is not effective.
To correct this and make your breathing technique most effective, you will need to practice numerous non-breathing repetitions. On each non-breathing repetition, focus on both the visual and kinesthetic cues of the arm entry and pull, so that on a breathing stroke you can comply with effective motions by only relying on the kinesthetic cues. (For a free download of the complete list of Freestyle SwimCues, click here.)
It is not necessary – or even preferred – to alternate breathing and non-breathing strokes. While breathing on both sides can improve perception and help a swimmer to gain symmetry, there is no guarantee that it will help you swim faster. No matter how often you breathe, it is always important for swimmers to check the cues to assure a symmetrical stroke.
So what’s the bottom line?
If you develop a fast and efficient breathing motion, the body position will not be distorted and you will be able to breathe whenever it is necessary. Breathing every right arm or every left arm should not generate extra resistance or negatively impact performance.
Want to learn more cues? Click here for a free download of the complete list of Freestyle SwimCues.
You can also visit the Swimming Technology Research Science pages to learn more.


