Subscribe

admin

About admin

This author has not yet filled in any details.
So far admin has created 19 blog entries.

4 Technique Tips That Will Benefit Almost EVERY Swimmer

Every swimmer has different strengths and limitations. However, research has shown that almost all swimmers can make improvements on these 4 technique elements to swim faster.

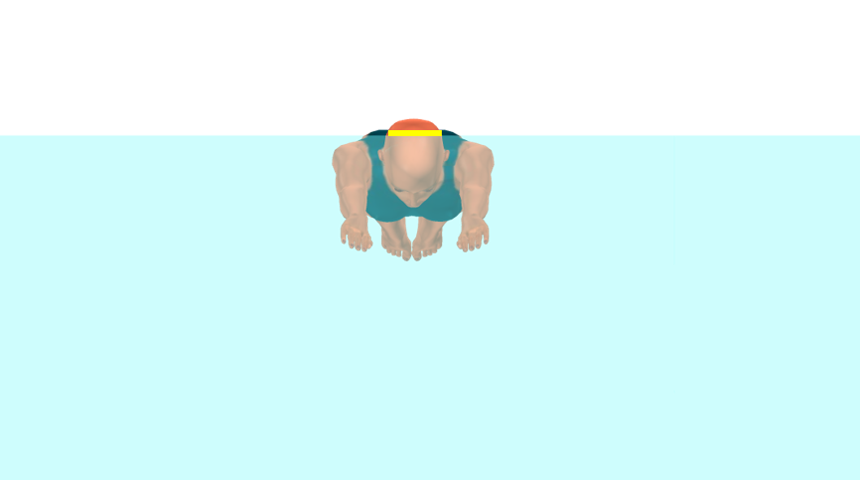
1. Butterfly – Limit head submersion on arm entry.

Cue: Feel the water level at the top of the head when the hands enter the water.
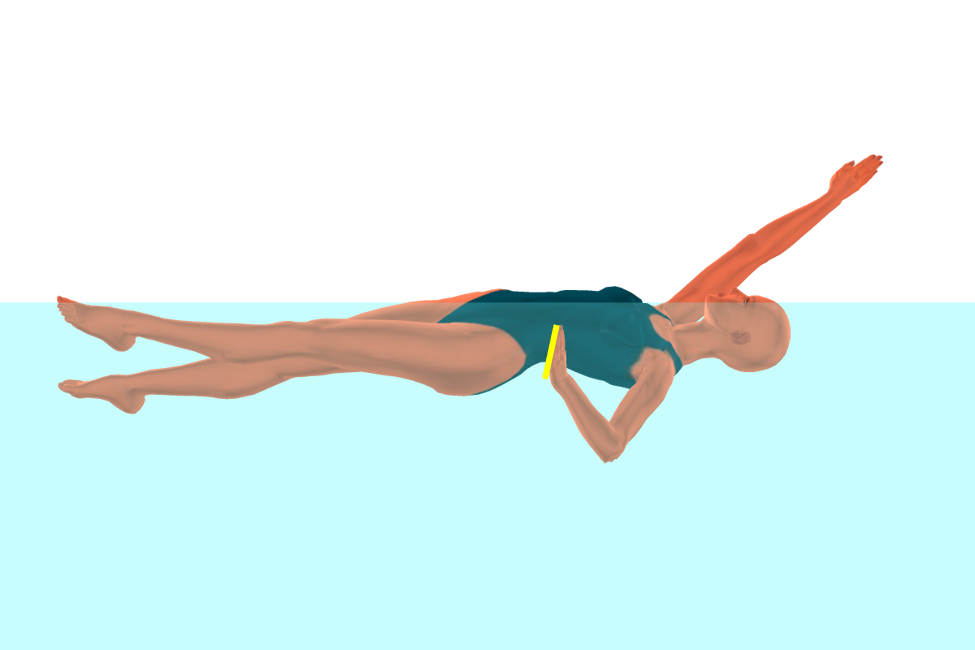
2. Backstroke – Increase hand force throughout the push phase.

Cue: Feel the hand pushing water back towards the feet throughout the push phase.
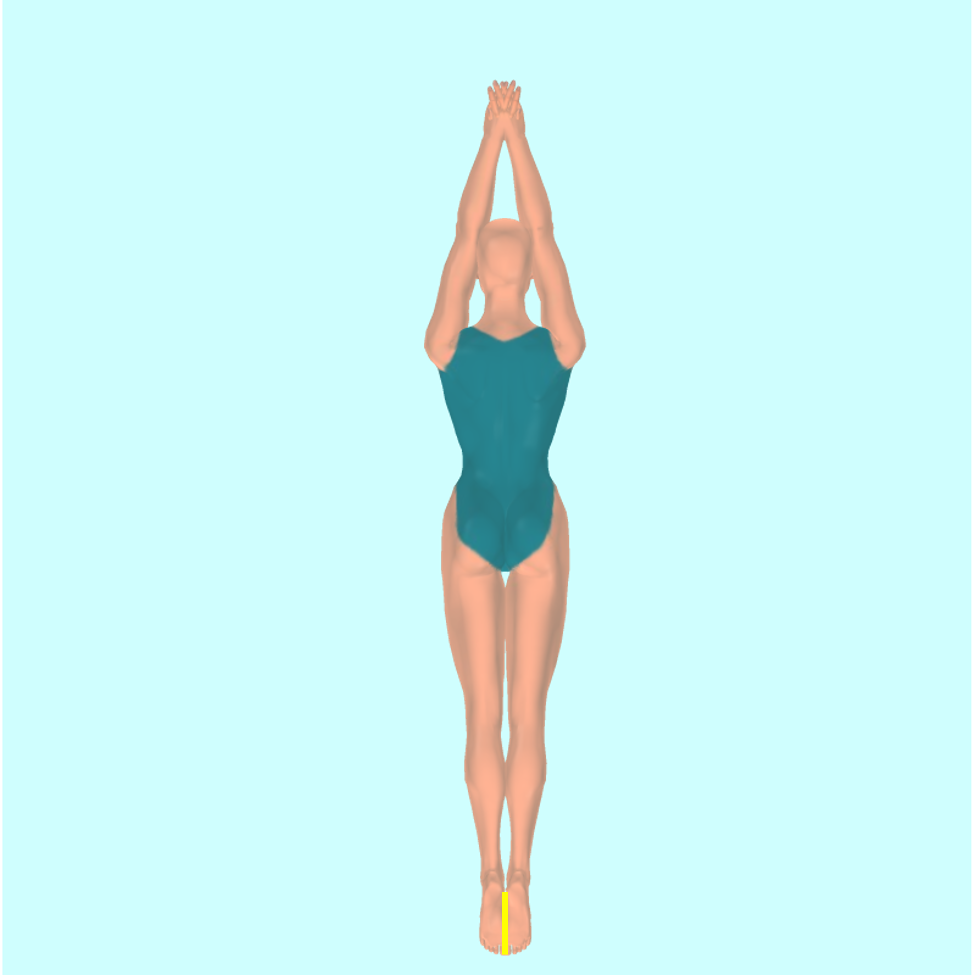
3. Breaststroke – Kick feet back and together so that they touch at the finish of every kick.

Cue: Feel the feet touch at the finish of every kick.
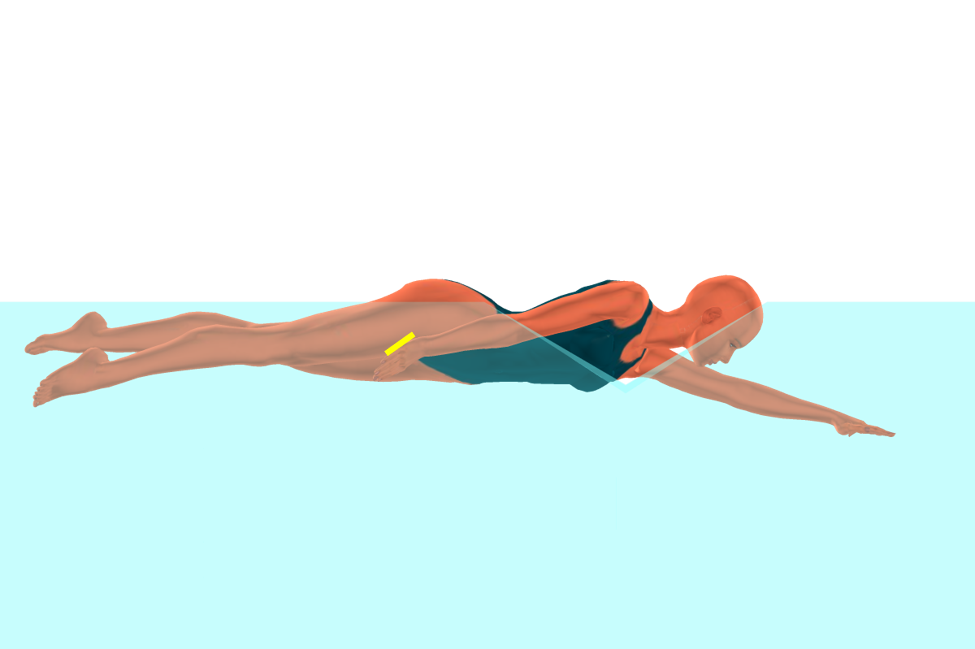
4. Freestyle – Push hand back beneath the thigh.

Cue: Feel the thumb touch the front of the thigh at the finish of every stroke.
 

By |2020-01-22T20:11:09+00:00January 25th, 2019|Uncategorized|1 Comment

Loch Ness Monster Neck

Loch Ness Monster Neck (Otherwise known as breathing position in breaststroke!)

During a recent meeting with a client, I was asked:  What’s up with the Loch Ness Monster neck you recommend for breaststroke breathing?”

It took only a few seconds to understand the question – – and a few more to stop laughing. What a great question though – – and one that made sense to us both.  That’s because I do teach a pretty different approach to breaststroke breathing. It’s definitely not a hoax though, as science clearly shows a better way than what conventional wisdom tells us. (By the way, we don’t actually refer to an effective breathing position as “Loch Ness Monster Neck.”)

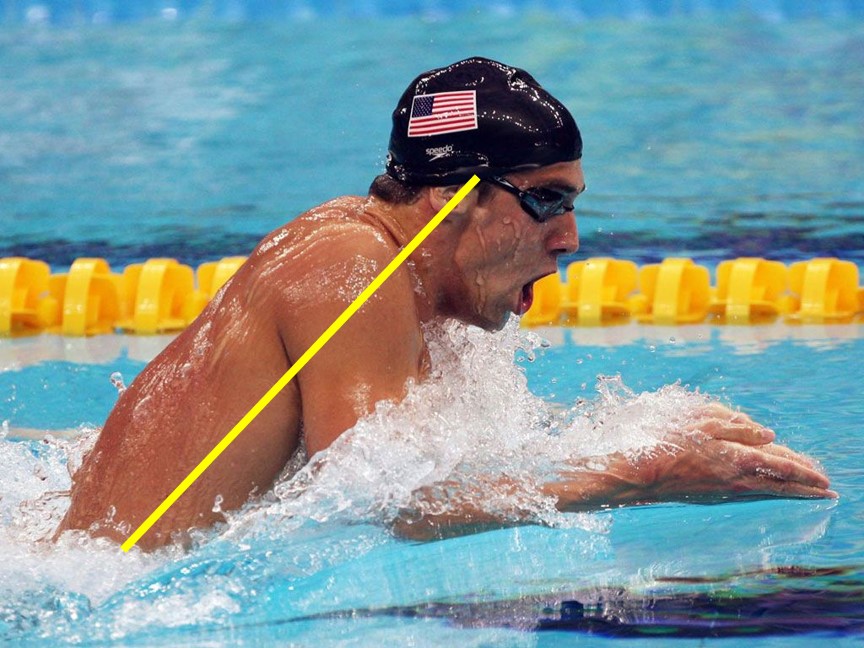
Common recommendations for breaststroke breathing call for lifting the “head, neck, and upper chest out of the water to breathe.”  In Figure 1, Michael Phelps does exactly that.

Figure 1. Michael Phelps breathes on breaststroke.

In addition, many sources recommend a “neutral” angle at the neck while maintaining the head and torso “in alignment.”  You can see clearly that these recommendations require “lifting the head” (a strictly vertical motion maintaining the alignment of head, neck, and body), as opposed to “extending at the neck” (a primarily rotational motion of the head about the neck).

So what’s wrong with this picture and how does the “Loch Ness Monster neck” make a difference?

First, let’s consider the laws of physics.

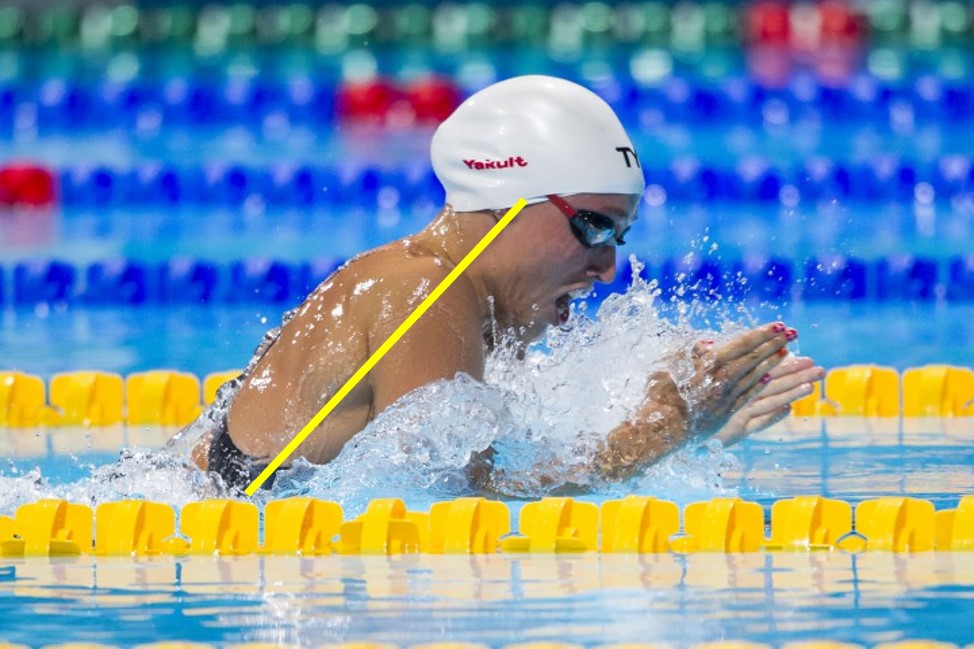
That angled body position creates considerable additional resistance as more of the surface of the upper body must push through the water.  Think about it and try a simple experiment. (No need to jump in the pool.)  Imagine riding in a car with the window open and your arm out. Hold your hand parallel to the road for a few seconds. Then, flex at the wrist to hold your hand perpendicular to the road.  Which position generates more resistance against your hand?  Now, think about that same movement in water, which generates considerably more resistance than air. The angled body is a less hydrodynamically effective shape that increases both form resistance (underwater) and wave resistance. (See Figure 2.)

It seems “eyeball” obvious that maintaining a position more parallel to the water would make a difference.

Figure 2. An above surface arm recovery is consistent with the excess upward head and body motion of typical breaststroke technique. Also, note the wave resistance. Is there any way that could help a swimmer swim faster?

How about the biomechanics of that excess vertical motion?

The typical upward breathing motion limits a swimmer’s speed in a number of related ways:

  • Generating upward body motion compromises forward arm propulsion.
  • A decrease in arm propulsion, in turn, slows the swimmer’s velocity at a critical point in the stroke cycle – just prior to the kick recovery.
  • The excess vertical motion increases the path that the body travels. (Again think about just this one point: what is the shorter distance: a straight line or a curvy/undulating line?)
  • From the breathing position, it requires considerable time for the swimmer to regain the streamline position. (Which takes longer? Bobbing up and down or staying level and streamlined in the water?)


Which brings us to the Loch Ness Monster Neck.

There are two main options to position the mouth above the surface so that the swimmer can take a breath. The first option for breathing is to change the angle of the body. In Figure 3, the model maintains the nonbreathing neck orientation and angles the body. Much of her torso must push against water and wave resistance. (This is the option illustrated in Figures 1 and 2 above.)

It might help to look at an illustration rather than a photograph. (Figure 3 below)

Figure 3. In this illustration, the model has a 30o angle at the lower back and a 0o angle at the neck.


The second breathing option (Figure 4 below) is to change the angle at the neck to breathe. While this option might feel strange and seem difficult at first, it offers several advantages.

Figure 4. The model has a 12o angle at the lower back and is extending her neck through the full range of motion (about 60o angle at the neck). The front view shows an improved hydrodynamic shape.

If the body maintains a more level position by breathing with full neck extension, limitations are minimized. Specifically:

  • The arm motion generates more force to move the body forward instead of upward.
  • A greater arm propulsion maintains a greater body velocity prior to the kick recovery.
  • The more level body is more hydrodynamically shaped, reducing form and wave resistance.
  • Less vertical motion produces a shorter path for the body to travel.
  • From the breathing position, it requires less time for the swimmer to regain the streamline position.

So, how do you develop this improved breathing technique? Practice!

You probably already know that a swimmer will not naturally use the full range of motion at the neck to breathe.  Learning to use complete neck extension may initially be uncomfortable.  Consequently, swimmers may be discouraged from practicing sufficient repetitions. But there are 3 considerable rewards when a swimmer masters this breathing technique:

  1. Resistance is minimized as the body remains more horizontal
  2. Arm motion is more effective as the body travels a shorter path
  3. The reduced vertical motion enables the swimmer to more quickly regain the streamline position on every stroke cycle.

As with other technique improvements, there are cues that a swimmer can use to learn to completely extend the neck for a more effective breathing motion. Focusing on cues will help change the breathing motion.

Cue 1: As the neck begins to extend, the swimmer can feel the chin move forward through the water.

Cue 2: As the neck completely extends, the swimmer can feel the limit of the range of motion at the back of the neck.

Cue 3: When the head is in position to breathe, the swimmer can see the wall at the end of the pool.

Remember those two options?  If the swimmer does not change the neck angle, then he/she must change the body angle to position the mouth above the surface. When the body angle changes, the swimmer generates excess resistance, expends more energy, and swims slower.

I hope you’ll consider the “Loch Ness Monster Neck” and discover for yourself that this breaststroke breathing technique is real – and far more effective that the more conventional method!

By |2020-01-22T20:11:09+00:00December 5th, 2018|Uncategorized|Comments Off on Loch Ness Monster Neck

5 Swim Practice Habits That Will Help You Swim Faster

1. Chunk your workout.
Dedicate a specific distance to specific technique elements, speed, or effort level. For example, swim a set of 10 x 25 yards fly focused on keeping your head motionless at the surface of the water on the non-breathing strokes.

2. Commit to an improvement plan.
Set a short-term goal and determine how you will measure progress. For example, establish a base line stroke count for 25 yards/ meters and figure out how much variability there is in a given workout. Work on stroke count consistency before setting improvement goals.

3. Construct bottom-line instructions for each set.
Plan each training set using DIRT – distance, interval, repetitions, and time for each swim. Then, practice deliberately by following your plan for each set.

4. Focus on single technique adjustments.
There are two reasons for this. First, it is very difficult to maintain technique when fatigued and second, many elements of technique are complicated and must be learned in sequence. For example, a swimmer must control head position before addressing arm motions. Once one technique element is mastered, another can be added.

5. Give your body the time and fuel it needs to recover.
According to Dr. Joel Stager, Director of the ‘Doc” Counsilman Center at Indiana University, improvement happens with recovery – not stress, killer workouts or thought-free yardage. Dr. Stager is also a firm believer in the benefits of chocolate milk immediately after each practice to help the recovery process. (Learn more: http://www.indiana.edu/~ccss/files/Documents/Chocolate%20Milk%20Study%20Paper.pdf)

By |2020-01-22T20:11:10+00:00November 8th, 2017|Uncategorized|Comments Off on 5 Swim Practice Habits That Will Help You Swim Faster

5 Scientific Concepts Behind Optimal Technique

Do you know the real effect science has had on swimming? Here are 5 of the most important scientific concepts behind today’s most competitive swimming technique.

1. Swimming forces are composed of both lift and drag.

Why is this important? Research on lift and drag forces made it possible to determine optimal angles for the hand pitch and the hand path that would maximize propulsion.


 2. Hand speed must increase throughout the underwater motion.

Why is this important? During the underwater motion of all strokes, a swimmer should continually increase hand speed. Hand acceleration is critical for faster times.


 3. The Index of Coordination (IdC) quantifies the relative positions of the arms during the stroke cycle.  

Why is this important? When a swimmer is completing the push phase with one hand, he or she should immediately begin the pull phase with the other hand. This technique adjustment (creating a positive IdC) produces a more continuous source of propulsion resulting in faster times.


 4. The Law of Levers applies to the strength of different arm positions.

Why is this important? Applying the concept of leverage (i.e. the Law of Levers) makes it possible to determine how best to position the arm throughout the stroke cycle.


 5. The Drag Coefficient quantifies the impact of technique changes.

Why is this important? An accurate measurement of technique provides valuable information that allows both the coach and swimmer to evaluate the benefit of any technique improvement.

By |2020-01-22T20:11:10+00:00July 21st, 2017|Uncategorized|Comments Off on 5 Scientific Concepts Behind Optimal Technique

Unconventional Backstroke Start

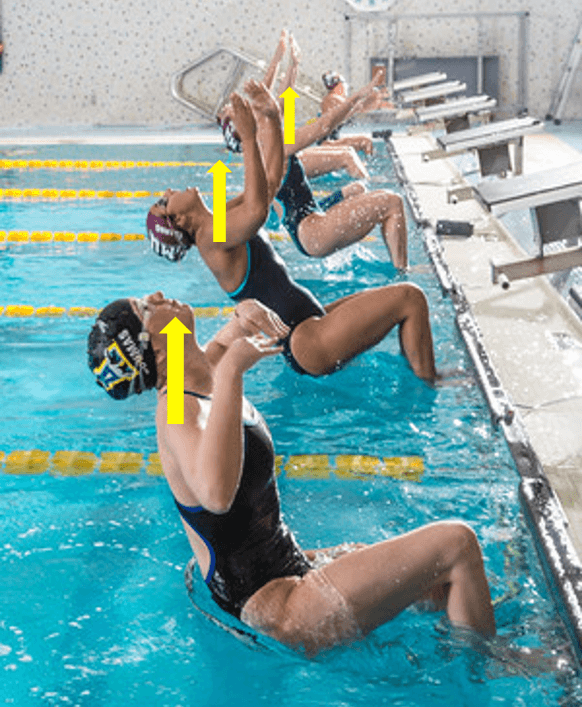
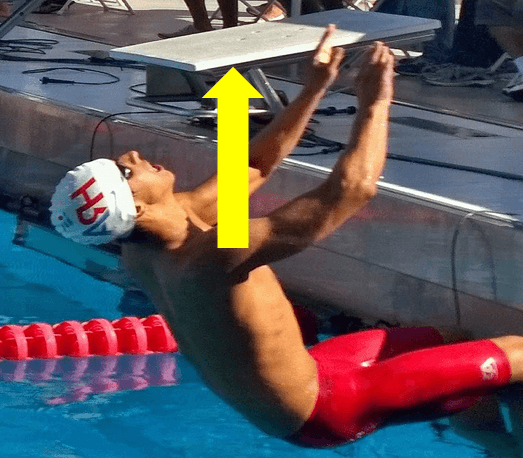
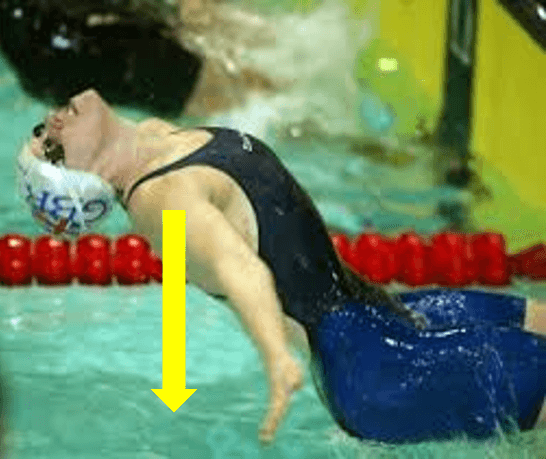
Racing starts can vary from swimmer to swimmer, but there is one constant: the desire to start the race as fast as possible. Based on biomechanics, we’ve got a take on the backstroke start that you may not have seen before. When executed correctly, this small change helps swimmers begin their race with maximum propulsive force.


Swimmers typically swing their arms above their shoulders on a backstroke start. This motion causes the swimmer to distribute force at a more downward angle on the wall—sometimes even causing feet to slip.

A swimmer will have less chances of having the feet slip on the wall and will be better able to generate propulsive force if the arms swing back below the shoulders and into a streamline.


 vs.


Give it a try on your next backstroke start!


By |2020-01-22T20:11:10+00:00June 15th, 2017|Uncategorized|Comments Off on Unconventional Backstroke Start

Fly Stroke Counting Exercise

If you’re reading our blog, you’re at least a little interested in swimming biomechanics and our science-based approach to technique. One question we often hear from coaches is, “Where do I start?”

It’s a good question: How do you begin to introduce this new approach to your club?

We suggest that a great way to begin is with numbers! In fact, we believe that quantitative data is the most valuable feedback you can give your swimmers. Happily, stroke counts provide quantative data that can help identify a swimmer’s strengths and weaknesses.

The stroke counting exercise below will help you gather quantitative data from your swimmers and use it in a meaningful way.

In a set of 25’s fly on an easy interval (like 1 minute), have swimmers count their strokes at increased levels of effort – 60%, 70%, 80%, 90% and 100%. Record the counts. (Make sure their push-off is consistent and they move their arms continuously.)

  1. Look at the variation with perceived level of effort. (Overall, each swimmer’s butterfly stroke counts should not vary more than 1-2 strokes in any effort level.) It is typical to see swimmers with low stroke counts for lower effort levels, and much higher counts (around 5 more) for higher effort levels. It is natural to move your arms faster when you want to go faster, but an increase in stroke count indicates that technique is suffering as a result.
  2. Working with your swimmers individually, identify what element of their technique is failing at higher effort levels. Maybe their breathing becomes exaggerated, or the arms are not completing the push phase. Discuss with the swimmer and make suggestions for improvement.
  3. Repeat!

Implementing this stroke counting exercise on a regular basis can help you track progress and skill mastery. And it gives you a clear way to add data – and science – to your workout.

By |2020-01-22T20:11:10+00:00May 24th, 2017|Uncategorized|Comments Off on Fly Stroke Counting Exercise

Triathletes: Losing your race on the swim leg?

The competitors beating you in the water aren’t faster because they spend more time in the water. They’re faster because they have better technique.

Many triathletes stand to make substantial time drops in their swimming leg by making small changes to their freestyle technique. And here’s the best part—technique changes (even drastic ones!) are best done in SHORT, focused training sessions. A 15-30 minute swim is plenty of time to concentrate on technique.

1.       Consult with a coach or technique expert on your personal technique strengths and weaknesses.

2.       Train with short swims (25yds are best) at a slow stroke rate where you are not getting fatigued.

3.       Concentrate on technique as much as possible during every training session. Don’t worry about swimming fast. As changes become more ingrained, you can slowly increase speed.

4.       As with any sport, swimming technique often gets worse as the athlete becomes fatigued. More reps done focused on technique when not fatigued, means more permanent technique changes.

Additional resources:

Sample Chapters of Approaching Perfect Freestyle E-book

Three technique elements you can’t swim well without

Video on freestyle head position


By |2020-01-22T20:11:10+00:00March 27th, 2017|Uncategorized|Comments Off on Triathletes: Losing your race on the swim leg?

4 Things to Look for in a Swim Camp

Swimming World recently posted its annual listing of swim camps. For any swimmer or parent considering which of the available camps to attend, we have a few suggestions.

4 Things to Look for in a Swim Camp

  1. Low swimmer to instructor ratio. If you’re working with one coach and 40 other swimmers, chances are you will receive very limited personal feedback. You’ll get more out of the session if you receive individual attention.
  2. Emphasis on technique over conditioning. Conditioning is important, but a week of intense training will not have a long term impact on your physical fitness or your speed. To the extreme, over training can cause injury and technique usually gets worse with fatigue.
  3. High level of instruction. Check the credentials of the instructors and coaches at camps you are considering. If you’re serious about swimming faster, look for a camp that offers more than white board workouts and someone to call out the sets.
  4. A positive overall experience. Keep your goals in mind! Whether you want to swim faster or just have fun and meet new people, there IS a swim camp out there for you!
By |2020-01-22T20:11:10+00:00March 2nd, 2017|Uncategorized|Comments Off on 4 Things to Look for in a Swim Camp
Go to Top